plenoptic.plot.eigendistortion_imshow_all#
- plenoptic.plot.eigendistortion_imshow_all(eigendistortion, eigenindex=[0, -1], channel_idx=None, distortion_scale=5.0, process_image=None, process_distortion=None, suptitle='Eigendistortions', suptitle_kwargs=None, **kwargs)[source]#
Display base image, eigendistortions alone, and eigendistortions added to the image.
This function creates a figure with 2 rows and
len(eigenindex)+1columns. The first row shows the eigendistortions alone, while the second shows the base image in the first column and then that image plus the eigendistortions (scaled bydistortion_scale) in the remaining columns.- Parameters:
eigendistortion (
Eigendistortion) – Eigendistortion object whose synthesized eigendistortion we want to display.eigenindex (
int|list[int] (default:[0, -1])) – Index of eigendistortion to plot. E.g. If there are 10 eigenvectors, 0 will index the first one, and -1 or 9 will index the last one. Note that this is the same as thebatch_idx(i.e., the index in the first dimension).channel_idx (
int|None(default:None)) – Which index to take from the channel dimension. IfNone, we assume image is RGB(A) and show all channels.distortion_scale (
float|list[float] (default:5.0)) – Amount by which to scale eigendistortion forimage + (distortion_scale * eigendistortion)for display. If a list, must be the same length aseigenindexand will multiply each distortion by the correspondingdistortion_scalevalue.process_image (
Callable[[Tensor],Tensor] |None(default:None)) – A function to process images in the second row. E.g., multiplying by the stdev ImageNet then adding the mean of ImageNet to undo image preprocessing or clamping between 0 and 1. IfNone, then no processing is performed.process_distortion (
Callable[[Tensor],Tensor] |None(default:None)) – A function to process images in the first row, the eigendistortions alone. IfNoneand the images are grayscale then no processing is performed. IfNoneand the images are color (i.e.,channel_idx is Noneand they have more than 1 channel), then we add 0.5 to the eigendistortions alone. This is because matplotlib will clip RGB(A) images to lie between 0 and 1, and eigendistortion values are typically centered around 0.suptitle (
str(default:'Eigendistortions')) – Super title to plot above all axes.suptitle_kwargs (
dict|None(default:None)) – Additional arguments formatplotlib.pyplot.suptitle.
- Return type:
- Returns:
fig – Figure containing the displayed images.
- Raises:
ValueError – If
distortion_scaleis not a single value andlen(distortion_scale) != len(eigenindex).ValueError – If a value of
eigenindexdoesn’t correspond to one of the synthesized eigendistortions.
- Warns:
UserWarning – If
process_distortion=Noneand we’re plotting images in color (i.e., becausechannel_idx is Noneand the image has more than one channel), because we are adding 0.5 to the distortion.
See also
synthesis_imshowDisplay single eigendistortion added to image.
Examples
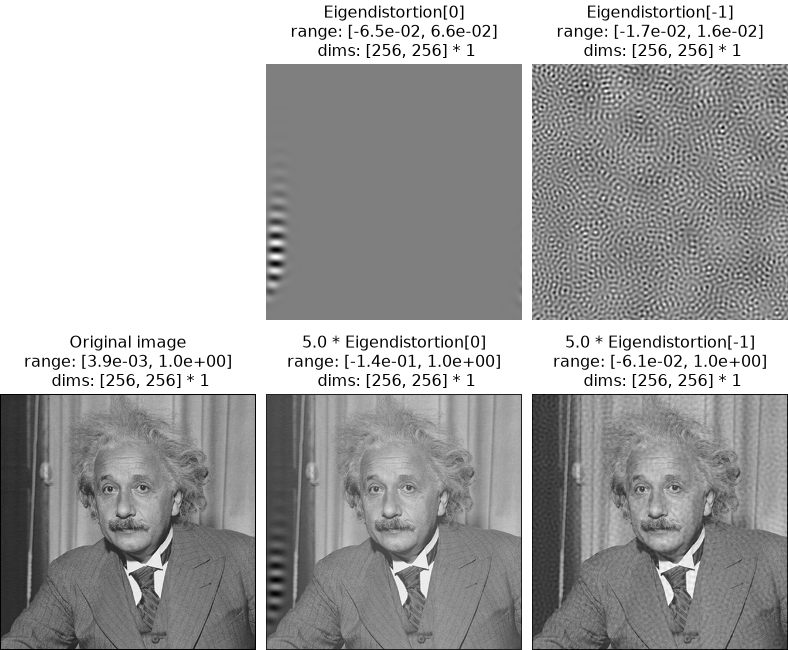
>>> import plenoptic as po
>>> import torch
>>> img = po.data.einstein().to(torch.float64)
>>> lg = po.models.LuminanceGainControl(
...     (31, 31), pad_mode="circular", pretrained=True, cache_filt=True
... ).eval()
>>> lg = lg.to(torch.float64)
>>> po.remove_grad(lg)
>>> eig = po.Eigendistortion(img, lg)
>>> # grab saved example eigendistortion, which runs the above to completion.
>>> eig.load(
...     po.data.fetch_data("example_eigendistortion.pt"),
...     map_location="cpu",
...     tensor_equality_atol=1e-7,
... )
>>> po.plot.eigendistortion_imshow_all(eig)
<PyrFigure size ...>

You can process the images before plotting by using the
process_imageargument. Here, we clip the images to lie between 0 and 1:>>> clip = lambda x: x.clip(0, 1) >>> po.plot.eigendistortion_imshow_all(eig, process_image=clip) <PyrFigure size ...>
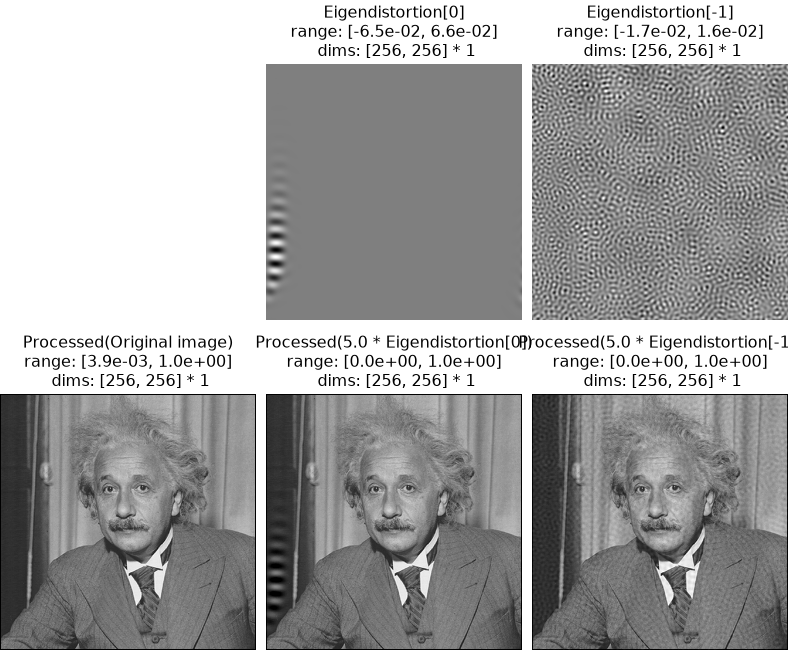
Note that we only apply
process_imageto the images on the bottom row (the base image and that image plus the scaled distortions), not the top row (eigendistortions alone). If you wish to also apply some processing to the top row, use theprocess_distortionsargument (see below for more examples).When the base image and distortions are RGB(A) images, if
process_distortionsis not specified, we will add 0.5 to the top row (the distortions alone). This is because matplotlib clips RGB(A) images to lie between 0 and 1. Since most eigendistortions are centered around 0, this would result in a unrepresentative visualization.>>> class ColorModel(torch.nn.Module): ... "Simple model that takes color image as input and outputs 2d conv." ... ... def __init__(self): ... super().__init__() ... self.conv = torch.nn.Conv2d(3, 4, 3, 1) ... ... def forward(self, x): ... return self.conv(x) >>> img = po.data.color_wheel().to(torch.float64) >>> img = po.process.center_crop(img, 20) >>> # Set seed for random initialization of model filters >>> po.set_seed(0) >>> model = ColorModel().to(torch.float64) >>> po.remove_grad(model) >>> model.eval() ColorModel(...) >>> eig_rgb = po.Eigendistortion(img, model) >>> eig_rgb.load( ... po.data.fetch_data("example_eigendistortion_color.pt"), ... map_location="cpu", ... ) >>> po.plot.eigendistortion_imshow_all(eig_rgb, zoom=10) <PyrFigure size ...>
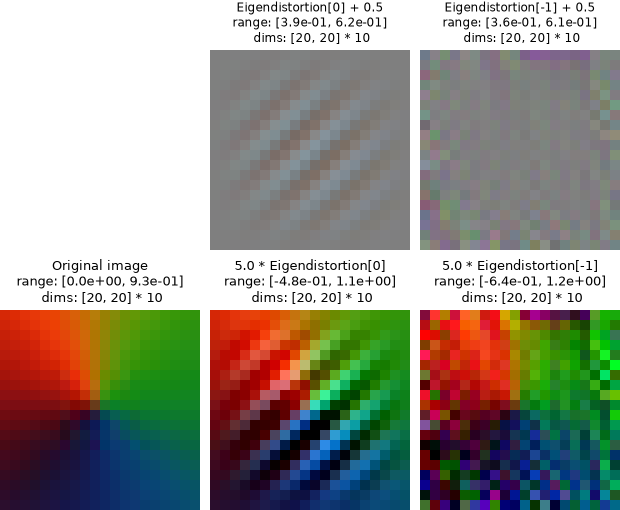
Note that the titles in the figure above specify that 0.5 has been added to the distortions.
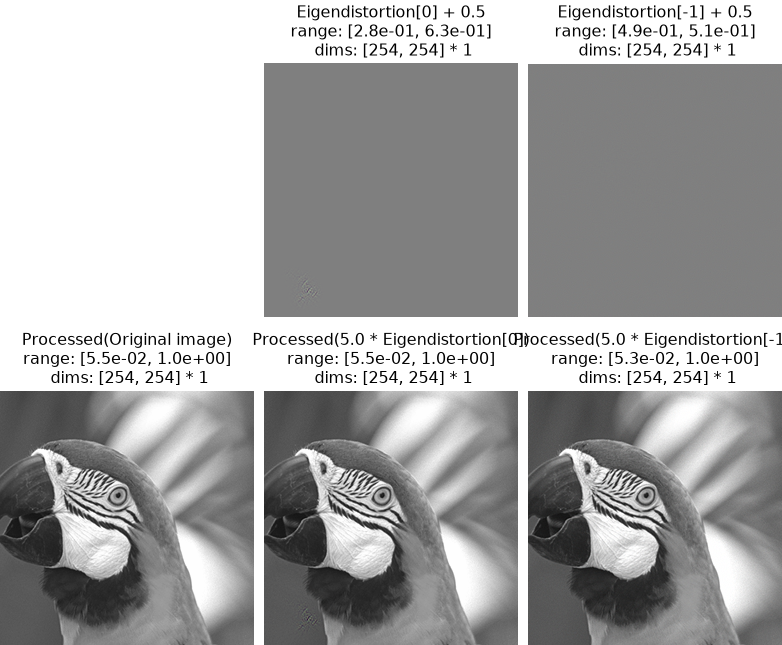
Another common use case for
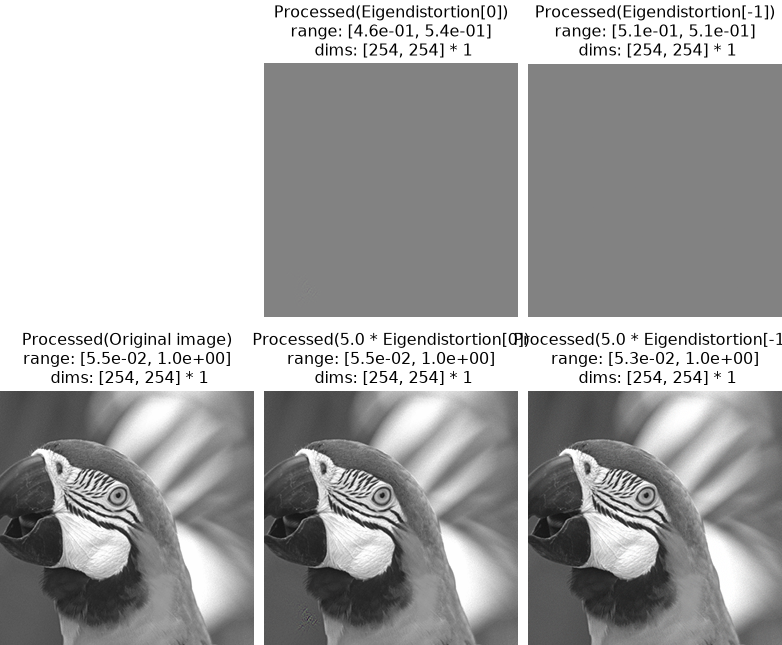
process_imageis in a situation like the following. Here, we are visualizing eigendistortions generated for VGG16, trained on ImageNet. As is common when using ImageNet, the images were z-scored during training. We should thus similarly normalize our base image when generating eigendistortions. However, when visualizing our distortions, we should un-normalize them, to transform them back into regular pixel space.process_imageallows us to do just that. (See the Reproducing Berardino et al., 2017 (Eigendistortions) notebook for more details about this result.)>>> from torchvision import models >>> from torchvision.models import feature_extraction >>> class TorchVision(torch.nn.Module): ... def __init__(self, model, return_node: str): ... super().__init__() ... self.extractor = feature_extraction.create_feature_extractor( ... model, return_nodes=[return_node] ... ) ... self.model = model ... self.return_node = return_node ... ... def forward(self, x): ... return self.extractor(x)[self.return_node] >>> def normalize(img_tensor): ... "Standardize the image for vgg16." ... return (img_tensor - img_tensor.mean()) / img_tensor.std() >>> img = po.process.center_crop(po.data.parrot(False).to(torch.float64), 254) >>> orig_mean = img.mean().detach() >>> orig_std = img.std().detach() >>> img = normalize(img) >>> vgg = models.vgg16(weights=models.VGG16_Weights.IMAGENET1K_V1) >>> vgg = TorchVision(vgg, "features.11").to(torch.float64) >>> po.remove_grad(vgg) >>> vgg.eval() TorchVision(...) >>> eig_vgg = po.Eigendistortion(img, vgg) >>> eig_vgg.load( ... po.data.fetch_data("berardino_vgg16.pt"), ... map_location="cpu", ... ) >>> def unnormalize(x): ... return x * orig_std + orig_mean >>> po.plot.eigendistortion_imshow_all(eig_vgg, process_image=unnormalize) <PyrFigure size ...>

In the above figure, as mentioned above,
process_imageis only applied to the bottom row of images, whereas the bottom row has just had 0.5 added to it. We can similarly apply this un-normalization to the bottom row:>>> po.plot.eigendistortion_imshow_all( ... eig_vgg, process_image=unnormalize, process_distortion=unnormalize ... ) <PyrFigure size ...>

Note that we are now only applying
unnormalize(not adding 0.5 and applyingunnormalize). If we wished, we could compose them ourselves (though in this specific case, that doesn’t make much sense):>>> process_distortion = lambda x: unnormalize(x + 0.5)